Easy F150 Fog Light Bulb Replacement in Minutes
Featured image for f150 fog light bulb replacement
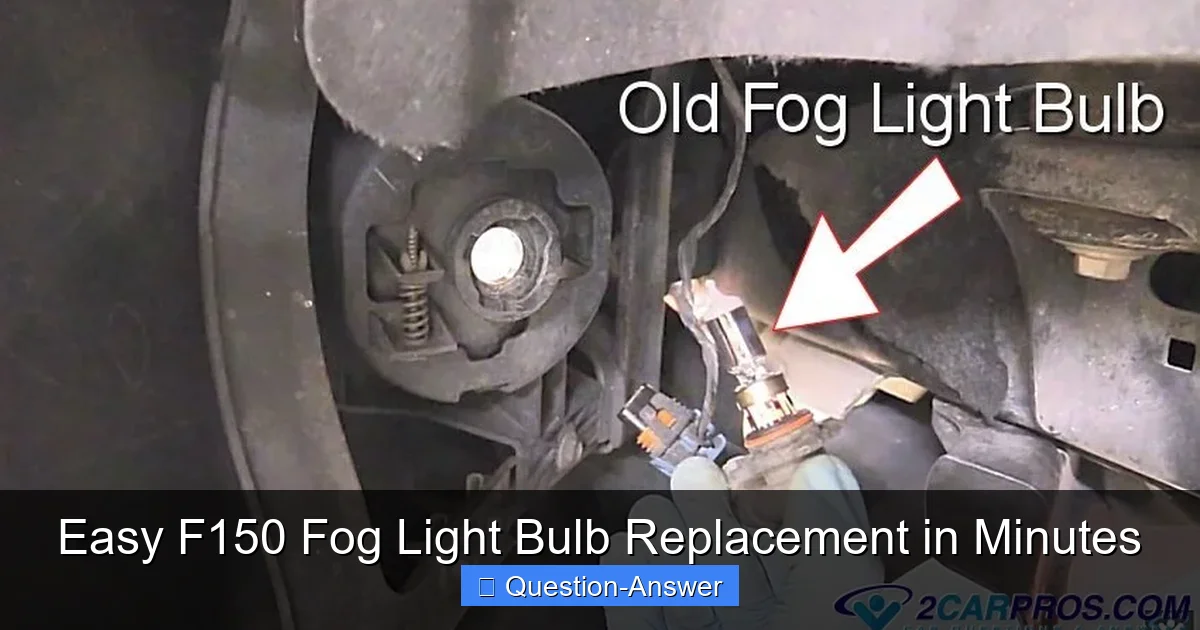
Image source: 2carpros.com
Replacing your F150 fog light bulbs is incredibly quick and easy, often taking just minutes! This comprehensive guide simplifies the process, showing you how to perform a DIY replacement without special tools or professional help. Get your F150’s visibility restored effortlessly and get back on the road fast.
Hey there, fellow F150 owner! Let’s chat about something that might seem a bit daunting at first: replacing your fog light bulbs. But guess what? I’m here to tell you that an f150 fog light bulb replacement is actually a super simple DIY project you can tackle in minutes. Seriously, it’s much easier than you probably think.
I remember the first time one of my fog lights went out. I dreaded the thought of taking it to a shop just for a bulb. But with a little courage and a quick look online, I realized it was something I could do myself. And ever since, replacing an f150 fog light bulb replacement has been a breeze. No special tools, no complex mechanics, just a bit of elbow grease and a few easy steps!
What’s the easiest way to replace the fog light bulbs on my F150, and what do I need to know?
Alright, let’s get right into it! Replacing your F150’s fog light bulbs is a straightforward process. You’ll feel really accomplished once you’re done, and you’ll save some money too!
What You’ll Need:
- New Fog Light Bulbs: Make sure they’re the correct type for your F150’s year and trim. You can usually find this in your owner’s manual or by checking online parts guides. This is a great time to consider upgrading to brighter LEDs if you’ve been thinking about it!
- Flathead Screwdriver: Mostly for prying back the wheel well liner, if needed.
- Gloves: Highly recommended, especially if you’re handling halogen bulbs. Oils from your skin can shorten their lifespan.
- Flashlight or Headlamp: To see what you’re doing in tight spaces.
- Optional: A floor jack and jack stands if you want more room to work, but it’s often not necessary.
The Step-by-Step Easy F150 Fog Light Bulb Replacement:
First things first, safety! Make sure your truck is parked on a level surface, the engine is off, and the parking brake is engaged. We don’t want any surprises.
-
Turn Your Wheels: This is a game-changer! To get better access to the fog light on the side you’re working on, turn your steering wheel all the way towards the opposite side. For instance, if you’re replacing the driver’s side bulb, turn your wheels all the way to the right. This opens up the wheel well a surprising amount.
-
Access the Fog Light: Look inside the wheel well, near the front bumper. You’ll see a plastic wheel well liner. You usually don’t need to remove the whole thing. Often, there’s a small section or a few plastic push-pins you can gently pry out with your flathead screwdriver to peel back part of the liner. This creates a “flap” for your hand to reach through. I usually just undo two or three of these pins. Don’t be shy; the plastic is pretty flexible!
-
Locate the Bulb: Reach through the opening you’ve created. You’ll feel the back of the fog light housing. The bulb will be connected to an electrical harness. Sometimes it’s right there, other times you might need to feel around a bit.
-
Disconnect the Harness: There’s typically a small tab or clip on the electrical connector. Press or pull it to release the harness from the back of the bulb. It might be a little stiff if it hasn’t been removed in a while, so be patient and gentle.
-
Remove the Old Bulb: Once the harness is disconnected, the bulb itself is usually held in by a twist-lock mechanism. Carefully twist the bulb counter-clockwise (about a quarter turn) and then pull it straight out of the housing. It should come out pretty easily.
Personal Tip: If you’re replacing halogen bulbs, remember what I said about gloves? Avoid touching the glass part of the new bulb. The oils from your skin can create hot spots, causing the bulb to burn out prematurely. Always hold it by the plastic base!
-
Install the New Bulb: Align the tabs on the new bulb with the slots in the fog light housing. Gently push it in and then twist it clockwise to lock it into place. Give it a gentle tug to make sure it’s secure.
-
Reconnect and Test: Reconnect the electrical harness to the new bulb until you hear a click or feel it snap firmly into place. Then, hop back into your F150 and turn on your fog lights to make sure the new bulb is working before putting everything back together.
-
Put Everything Back: Once you’ve confirmed your new light is shining brightly, push the wheel well liner back into place and reinsert any plastic push-pins you removed. Make sure everything is snug and secure.
Congratulations! You’ve just performed an f150 fog light bulb replacement like a pro. And you know what? It’s often a good idea to replace both fog light bulbs at the same time, even if only one is out. Why? Because if one has failed, its partner is likely not far behind. Plus, it ensures you have consistent light output from both sides, especially if you’re upgrading to LEDs.
See? I told you it was doable! An f150 fog light bulb replacement is a fantastic way to build your confidence in DIY car maintenance. So next time a fog light goes out, you’ll know exactly what to do. Happy driving!