Easy F150 Oxygen Sensor Replacement Guide DIY
Featured image for f150 oxygen sensor replacement
Image source: cf1fa98962a2be00e6b1-18c17b7484b52825caa0a8967aaa0cef.ssl.cf1.rackcdn.com
Replacing your F150 oxygen sensor is a straightforward DIY task that anyone can tackle, saving significant money on mechanic fees. This guide empowers you to diagnose common issues like a “check engine” light or poor fuel economy, providing clear, step-by-step instructions. With basic tools, you can confidently restore your truck’s performance and efficiency yourself.
Easy F150 Oxygen Sensor Replacement Guide DIY
Ever had that dreaded “Check Engine Light” glow angrily on your F-150 dashboard? It’s a moment that can make any truck owner’s heart sink a little. More often than not, especially if your truck feels a bit sluggish or is chugging more fuel, the culprit is a failing oxygen sensor. But here’s the good news, friend: an f150 oxygen sensor replacement is a totally manageable DIY project. You absolutely can tackle this yourself and save a good chunk of change!
Oxygen sensors are vital for your F-150’s engine performance and fuel efficiency. They measure the amount of oxygen in your exhaust gas, sending that data to your truck’s computer. This helps the computer adjust the air-fuel mixture, making sure your engine runs clean and strong. When one goes bad, your truck can suffer, but a DIY replacement means you’ll be back on the road, saving money and feeling proud of your work in no time.
So, how do I actually tackle an F150 oxygen sensor replacement myself, and what should I watch out for?
Replacing an oxygen sensor on your F-150 might sound intimidating, but it’s really a straightforward task if you take your time and follow a few key steps. I’ve been there, wrenching in the driveway, and I can tell you, the satisfaction of clearing that check engine light yourself is unmatched!
First, why are we doing this? Besides the infamous “Check Engine Light” (often with codes like P0133, P0171, or P0420), you might notice your F-150 guzzling more gas than usual, smelling like rotten eggs from the exhaust, or running a bit rough. These are all signs a sensor might be failing. Ignoring it can hurt your catalytic converter, which is a much pricier fix!
Gather Your Tools: You don’t need a fancy workshop for this. Here’s what you’ll want:
- An oxygen sensor socket (this is key – it has a slot for the wire).
- Ratchet (the size that fits your O2 socket).
- Penetrating oil (like PB Blaster or WD-40 Specialist Penetrant).
- Anti-seize compound (most new sensors come with this, but check!).
- Jack and jack stands (safety first!).
- Safety glasses and gloves.
- Maybe a flathead screwdriver or trim removal tool for stubborn connectors.
- A torque wrench (optional, but good for precise installation).
- An OBD-II scanner to read and clear codes.
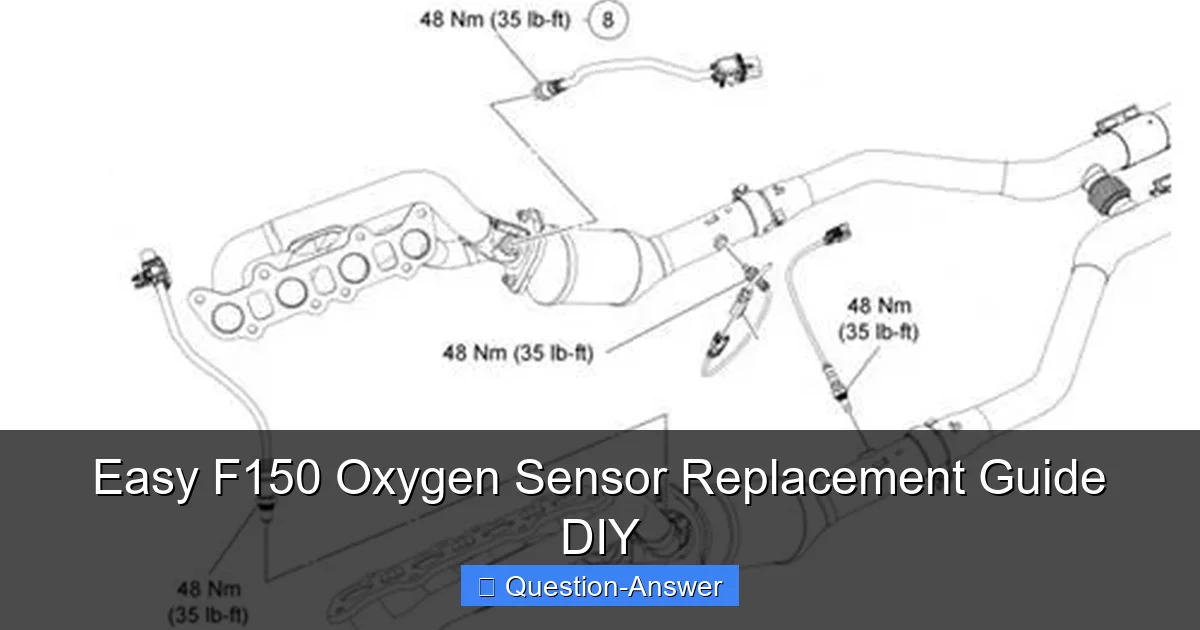
Identify Your Sensors: Your F-150 has multiple oxygen sensors. There are “upstream” sensors (before the catalytic converter) and “downstream” sensors (after the catalytic converter). They’re also designated by “Bank 1” (cylinder 1 side, usually passenger) and “Bank 2” (opposite side). Your OBD-II scanner will tell you exactly which one is faulty (e.g., P0133 points to Bank 1, Sensor 1 – an upstream sensor on the passenger side).
The Replacement Process – Step-by-Step (from my own garage experience):
- Safety First! Always disconnect your F-150’s negative battery terminal. Then, use your jack to lift the truck and place it securely on jack stands. Never work under a vehicle supported only by a jack.
- Locate the Culprit: Depending on the sensor, it could be on top of the exhaust manifold (upstream) or along the exhaust pipe (downstream). They look like a small, metal tube with a wire coming out.
- Spray and Wait: This is a crucial step I learned the hard way. Spray the base of the old sensor generously with penetrating oil. Let it soak for 15-30 minutes, or even longer if it’s really rusted. Some folks even spray it the night before!
- Disconnect the Electrical Connector: This can be the trickiest part! The connectors often have a small tab you need to push or squeeze to release them. Be gentle; they can become brittle with age. I once nearly broke one trying to rush it.
- Remove the Old Sensor: Fit your O2 sensor socket over the sensor and onto your ratchet. With firm, steady pressure, turn counter-clockwise to loosen and remove. It might be stiff, but that penetrating oil helps a ton.
- Prepare the New Sensor: Apply a small amount of anti-seize compound to the threads of the new sensor. Do not get it on the sensor tip! This prevents it from seizing up again in the future.
- Install the New Sensor: Carefully thread the new sensor into the exhaust bung by hand first. This prevents cross-threading. Once it’s hand-tight, use your O2 socket and ratchet to tighten it. If you have a torque wrench, use your F-150’s specific torque specs (usually around 29-33 ft-lbs). Otherwise, snug it up – don’t overtighten, or you risk stripping the threads.
- Reconnect and Reassemble: Plug the electrical connector back in until you hear a click or feel it seat firmly. Reconnect your battery terminal.
- Clear the Codes: Use your OBD-II scanner to clear the stored fault codes.
- Test Drive: Take your F-150 for a drive! It might take a few driving cycles for the computer to fully “learn” the new sensor and for the “Check Engine Light” to stay off permanently, but usually, it goes away right away.
While the job is generally straightforward, accessing some sensors, especially upstream ones deep in the engine bay, can be a tight squeeze. Be prepared to contort a bit, or use extensions on your ratchet. But trust me, the feeling of accomplishment (and the money saved!) makes it all worthwhile.
Tackling an f150 oxygen sensor replacement yourself is a fantastic way to understand your truck better, save some serious cash, and gain a real sense of accomplishment. It’s a common issue, but with a few basic tools and a bit of patience, you’ll have your F-150 running smoothly and efficiently again. Go on, give it a try – you’ve got this!