Why F150 Diff Lock Won’t Disengage Troubleshooting Guide
If you’re wondering why f150 diff lock won’t disengage, you’re definitely not alone. It’s a common issue that can trip up even experienced truck owners. This problem can seem complicated, but don’t worry! This guide will break it down step-by-step. We’ll explore the reasons behind the issue and give you a straightforward, easy-to-follow process to get your diff lock working right again. Get ready to discover the simple solutions to this frustrating problem.
Key Takeaways
- Learn the common reasons why the F150 differential lock can fail to disengage.
- Understand the difference between the front and rear differential locks in your truck.
- Discover the importance of proper vehicle speed and alignment when disengaging.
- Find out how to check the electrical components involved in the locking system.
- Get step-by-step instructions to troubleshoot and potentially fix the issue at home.
Common Reasons for F150 Diff Lock Problems
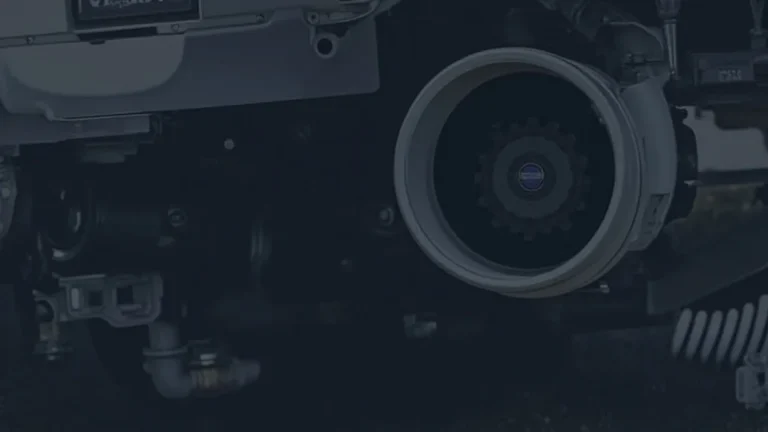
Many factors can cause an F150’s diff lock to stick, leaving drivers stranded or with limited off-road capability. This section will look at the common issues, including mechanical problems and electrical failures, so you can identify the root of the problem. Knowing the potential causes will allow for a more efficient diagnosis. We’ll explore everything from sensor malfunctions to physical obstructions that could be preventing your diff lock from releasing.
Mechanical Issues
Mechanical problems are often the first place to look when your diff lock refuses to cooperate. These issues can range from simple wear and tear to more serious damage. Regular use and exposure to the elements can take a toll on your truck’s components. Addressing these mechanical issues promptly can prevent more extensive and expensive repairs later on. A thorough check of your truck’s mechanical systems can help identify any underlying issues hindering your diff lock’s performance.
- Wear and Tear: Over time, the internal components of the differential, such as the clutch packs or gears, can wear down. This wear can make it difficult or impossible for the diff lock to fully engage or disengage. This is more common in trucks that frequently use their diff lock or are subjected to harsh conditions.
- Physical Obstructions: Debris, such as mud, rocks, or other foreign materials, can get lodged within the differential housing. This can prevent the moving parts from operating freely, leading to the diff lock getting stuck. Off-road driving increases the risk of debris entering the system.
- Damage to Internal Components: Severe impacts or aggressive off-roading can damage the internal components. Bent or broken gears and clutch packs may not allow the differential to operate correctly. These failures typically require professional repair or component replacement to restore functionality.
Wear and tear on differential components often results from the friction created when the truck’s wheels are constantly turning at different speeds. This friction is intensified when the diff lock is engaged, as the system is designed to lock the wheels together, forcing them to turn at the same rate. This constant friction causes the surfaces of the gears and clutch packs to erode over time. Metal shavings and debris then mix with the differential fluid, accelerating the wear and eventually hindering the smooth operation of the diff lock.
Physical obstructions in the differential can occur when driving in challenging environments like muddy trails or rocky terrains. Mud and debris can enter the housing through seals or vents and build up, creating friction and impeding the mechanical components’ movement. When the diff lock is engaged, and the wheels need to move at the same speed, these obstructions can prevent the parts from sliding smoothly, making it hard to disengage the lock. A blocked system can lead to serious damage, making timely inspection and cleaning vital.
Damage to the internal components of a differential, such as gears and clutch packs, often results from extreme conditions like sudden impacts during off-road use or when wheels encounter a significant obstacle while the differential is locked. This can cause components to chip, bend, or break. Such damage prevents the gears from meshing correctly or the clutch packs from compressing as needed. The result is a failure of the diff lock, rendering it unable to engage or disengage properly. Immediate intervention, including a complete inspection and possible component replacement, is necessary to fix this.
Electrical Failures
Alongside mechanical troubles, electrical issues play a big role in diff lock problems. Your F150’s diff lock system relies heavily on sensors, actuators, and the electronic control module (ECM) to function correctly. A problem in any of these electrical parts can prevent the diff lock from engaging or disengaging. Troubleshooting electrical faults needs a systematic approach, often involving diagnostic tools and an understanding of the truck’s electrical systems. Checking the electrical system is important, as problems here can be as troublesome as mechanical ones.
- Sensor Malfunctions: The diff lock system relies on sensors to monitor the wheel speed and the status of the differential. A faulty sensor can provide incorrect data to the ECM, causing it to fail to engage or disengage the diff lock. Replacing a malfunctioning sensor is often a straightforward fix.
- Wiring Issues: Damaged or corroded wiring can disrupt the electrical signals needed to operate the diff lock. Check the wiring harnesses and connectors for damage. Electrical shorts or open circuits can prevent the actuator from receiving the necessary power to engage or disengage the lock.
- Actuator Failure: The actuator is the component that physically engages and disengages the diff lock. If the actuator fails, the diff lock will not operate correctly. This can be caused by electrical or mechanical issues within the actuator itself.
Sensors are essential to monitor the wheel speed and the differential’s state. When a sensor fails, it sends incorrect data to the ECM. This data is the basis for the ECM’s decision-making about the operation of the diff lock. For instance, a speed sensor that incorrectly reports wheel speeds may prevent the diff lock from disengaging because the ECM thinks the truck is still moving at a speed where disengagement isn’t possible. Troubleshooting sensor malfunctions usually involves using a diagnostic tool to check sensor readings, and if a sensor is found faulty, replacing it is often the solution.
Wiring problems often stem from environmental factors, such as moisture and road salt. Corroded connections or damaged wires disrupt the flow of electrical signals required for the differential lock to operate correctly. Symptoms of wiring issues include intermittent failures, difficulty engaging or disengaging the lock, and a lit warning light on the dashboard. Wiring problems require careful inspection of all related harnesses and connectors. Replacing damaged or corroded wiring and ensuring proper connections is crucial for restoring the functionality of the diff lock.
The actuator, typically an electric motor or solenoid, is responsible for the mechanical process of locking and unlocking the differential. When an actuator fails, the diff lock system will not function as it should. Failures can result from electrical issues, such as a short circuit or open circuit within the actuator, preventing it from receiving the power to operate, or mechanical issues such as wear, causing the actuator’s internal components to seize up. Testing the actuator’s functionality using a multimeter or a diagnostic tool can often pinpoint the problem. Replacing a faulty actuator will often restore the diff lock’s functionality.
Steps to Troubleshoot Why F150 Diff Lock Won’t Disengage
When you’re dealing with a stuck diff lock, following a structured approach is essential. This section gives you a step-by-step guide to help you find the source of the problem and get your truck running right again. We’ll start with basic checks and move on to more involved diagnostic procedures. Understanding these steps will empower you to fix this issue.
Initial Checks and Visual Inspections
Begin with a visual assessment and simple tests before moving into more advanced procedures. This section emphasizes the importance of a thorough overview, helping you spot obvious problems. Quick checks can often identify the root cause, saving time and effort. From looking at the exterior to checking fluid levels, these initial inspections set the foundation for a more detailed diagnosis.
- Check for Obvious Obstructions: Examine the area around the differential for any physical obstructions, such as rocks, mud, or debris, that might be preventing the diff lock from disengaging. Clear away any obstacles you find.
- Verify Fluid Levels and Condition: Check the differential fluid level and its condition. Low fluid levels or contaminated fluid can lead to mechanical problems. A dirty fluid might suggest wear or internal issues.
- Inspect Wiring and Connectors: Look over the wiring harnesses and connectors associated with the diff lock for any visible damage, such as cuts, abrasions, or corrosion. Loose connections can also cause problems.
Carefully inspect the area around the differential housing for any visible obstructions. Rocks, mud, or debris that has accumulated can physically prevent the mechanical components of the differential lock from moving freely. Clearing the area around the differential allows you to visually access the components and can often solve the issue quickly. Using a pry bar or screwdriver, you can clear debris or ensure the system has room to function as designed. Thorough cleaning is recommended.
Checking the differential fluid level and condition is a basic maintenance step that often reveals important clues. Low fluid levels can fail to properly lubricate the moving parts, leading to increased friction and wear. Contaminated fluid, often characterized by a dark color or the presence of metal particles, indicates wear of internal components. Ensure the differential is filled to the correct level, and if the fluid looks dirty or contains metal shavings, it’s a good idea to change it and check for any internal damage that may be present.
A careful inspection of the wiring harnesses and connectors associated with the diff lock system is important. Wiring can be damaged by environmental factors like water and road salt, leading to corrosion and poor electrical connections. Carefully trace the wires from the differential to the control module, looking for any signs of damage such as cuts, abrasion, or loose connections. Inspect the connectors for corrosion or dirt that might interfere with the electrical signals. Cleaning or replacing any damaged wiring or connectors can fix problems. Pay close attention to connectors that are near the ground, where they are more vulnerable to moisture and corrosion.
Check Vehicle Conditions for Disengagement
Certain conditions are needed for the diff lock to disengage correctly. Ensuring that these conditions are met is a vital first step in troubleshooting the problem. This segment will explore the conditions necessary for disengagement, helping you eliminate simple factors. Learning how speed and alignment influence the operation of the diff lock is important for correct diagnosis and operation.
- Verify Vehicle Speed: The diff lock will often not disengage if the vehicle is moving at a speed that is too high. Try slowing the truck down or even stopping it completely.
- Check Steering Alignment: Make sure the wheels are straight. Excessive steering angle can put stress on the system and prevent disengagement. Drive forward or backward in a straight line while attempting to disengage the lock.
- Try Driving in Reverse: Sometimes, a slight change in the direction of the wheels is all that’s needed. Try backing up the truck while attempting to disengage the diff lock.
One of the most common reasons an F150’s diff lock fails to disengage is driving at speeds too high. The ECM is programmed to disengage the differential lock only under certain speed conditions. Moving above these thresholds can prevent the system from operating. Reduce your speed, as the ECM monitors the wheel speed. In some situations, stopping the vehicle altogether is the best method to enable the diff lock to release. This allows the system to reset, and you can try disengaging again.
The F150’s diff lock system depends on proper alignment for effective disengagement. If the wheels are turned at a sharp angle, the system may experience extra stress, preventing the mechanism from releasing. Before trying to disengage the diff lock, ensure the wheels are straight and the vehicle is moving in a straight line, either forwards or backwards. Doing this reduces the tension on the differential components. This simple adjustment can often lead to the successful disengagement of the diff lock, resolving the issue quickly.
Sometimes the mechanical components of the diff lock can be under pressure. Backing up the vehicle can change the tension on these components, allowing the lock to release. When you engage the reverse gear, this can realign the gears inside the differential and allow the lock to disengage. This simple trick can be effective if the lock is stuck due to minor friction or misalignment. Ensure there are no obstructions behind the truck before backing up.
Electrical System Diagnostics
When the visual checks are done and vehicle conditions are correct, turn your focus to the electrical side. This section guides you through electrical testing, from checking fuses to using diagnostic tools. Understanding electrical tests will help you pinpoint the issue within the electrical system. By using tools and following these tests, you can diagnose the problem accurately and know what to fix.
- Check Fuses and Relays: Inspect the fuses and relays related to the diff lock system. A blown fuse or faulty relay can cut off power to the actuator. Replace any faulty components.
- Use a Diagnostic Scanner: A diagnostic scanner can read the trouble codes stored in the ECM, which can provide clues about electrical faults. The scanner can also activate the diff lock system for testing.
- Test the Actuator: If you have access to a multimeter, you can test the actuator to ensure it is receiving power and ground. Check the actuator’s wiring connector for the appropriate voltage when attempting to engage or disengage the diff lock.
Fuses and relays provide crucial protection and control for electrical systems. When troubleshooting an F150’s diff lock, checking the fuses and relays is a great start. Locate the fuses and relays related to the diff lock system, usually found in the engine compartment or interior fuse box. Remove each fuse and inspect it for a broken filament. Test relays with a multimeter to make sure they are switching properly. A blown fuse or faulty relay stops power from getting to the actuator, which prevents the diff lock from engaging or disengaging. Replacing a blown fuse or a faulty relay is a quick and effective solution.
A diagnostic scanner is an important tool for diagnosing electrical issues. Connect the scanner to your truck’s OBD-II port to read any trouble codes from the ECM. These codes give important information about potential problems in the diff lock system. The scanner can also let you activate the system for testing. Using the scanner allows you to see if the actuator and sensors are working as they should, as well as if there are any issues with the control module. Review any diagnostic trouble codes displayed and use those to guide your troubleshooting. This will help you identify the root cause of the problem.
Testing the actuator is a key step in diagnosing issues with the diff lock system. The actuator, usually an electric motor or solenoid, is responsible for the mechanical process of locking and unlocking the differential. You can use a multimeter to check the electrical signals going to the actuator. You should check the wiring connector for the right voltage when trying to engage or disengage the diff lock. If there is no voltage, there is a problem with the electrical supply, such as a blown fuse or a wiring issue. If voltage is present but the actuator does not move, the actuator itself may be faulty. Identifying issues with the actuator will help you pinpoint the problem and determine whether to replace it or check the wiring.
Common Problems and Solutions
This part explores the solutions to the most common problems that prevent your F150 diff lock from disengaging. From replacing sensors to flushing fluids, we’ll cover the steps you can take to get your truck back to operating correctly. Knowing these solutions can help you decide how to fix the problem, whether you do it yourself or bring it to a professional.
Sensor Replacement and Calibration
Sensors are essential components, and if they’re faulty, they can cause problems with the diff lock. Here’s how to diagnose and fix sensor problems. Regular checks of your sensors can prevent these problems from happening and keep your diff lock working.
- Identify the Faulty Sensor: Use a diagnostic scanner to identify which sensor is causing the problem. The scanner can provide trouble codes that pinpoint which sensor is failing.
- Replace the Sensor: Once you’ve identified the faulty sensor, replace it. The replacement process usually involves removing the old sensor and installing the new one.
- Calibrate if Necessary: Some sensors may need calibration after replacement. Follow the manufacturer’s instructions to calibrate the new sensor using a diagnostic scanner. This will ensure that the ECM receives accurate data from the new sensor.
When dealing with an F150 diff lock issue, the first step is often diagnosing which sensor is at fault. A diagnostic scanner is invaluable here. The scanner connects to the truck’s OBD-II port and reads any trouble codes stored in the ECM. Each code is linked to a sensor, so the scanner tells you which one is failing. You might see a code for a wheel speed sensor or a position sensor, which will point to where the problem is. Identifying the exact faulty sensor makes the repair process easier, allowing for focused and effective troubleshooting.
Once you’ve identified which sensor is faulty, replacing it is often a straightforward process. The specific procedure will vary depending on the sensor’s location, which can include the differential housing or the wheel hub. Usually, the old sensor can be removed by disconnecting the electrical connector and unscrewing it from its mounting. The new sensor is then installed, which includes connecting the electrical connector and mounting it securely. It’s often helpful to consult your truck’s service manual or search for specific instructions to ensure you are following the correct steps and that the replacement is done correctly.
Some sensors need calibration after they are replaced. Calibration ensures that the new sensor gives precise data to the ECM. After replacing a sensor, consult the manufacturer’s instructions for the specific calibration process. This typically involves using a diagnostic scanner to access the calibration menu in the ECM. The scanner then steps you through the calibration process, which may include entering specific values or driving the truck under specific conditions. Proper calibration is important because it allows the ECM to understand the new sensor’s parameters, guaranteeing that the diff lock works as intended.
Wiring Repair and Replacement
Damaged wiring is a common cause of diff lock problems. This section will guide you through fixing and replacing wires. Correctly addressing wiring issues is important for a long-lasting fix.
- Locate the Damaged Wiring: Inspect the wiring harness and connectors for any signs of damage, such as cuts, abrasions, or corrosion. Trace the wiring from the diff lock to the ECM.
- Repair or Replace Damaged Wiring: If you find damaged wiring, you can either repair it using crimp connectors or replace the entire section of wire. Make sure you use the proper gauge wire and connectors.
- Ensure Proper Connections: Make sure all the connections are secure and that the wires are properly routed and protected. Use electrical tape or wire looms to protect the wiring from damage.
The first step in fixing wiring problems is to find the damaged wiring. Start by visually inspecting the wiring harnesses and connectors associated with the diff lock system. Pay attention to areas that are exposed to the elements or are at risk of mechanical damage, such as near the differential or under the truck. Look for cuts, abrasions, or corrosion on the wires and connectors. Carefully trace the wiring from the differential lock to the ECM and other connected components to identify any spots of damage. A thorough inspection will help you identify the areas that need immediate repair or replacement, which will get your system working again.
Once you’ve found the damaged wiring, you can either repair it or replace the entire section. For minor damage, you can repair the wiring using crimp connectors. Cut the damaged section of the wire, strip the insulation, and securely connect the wires using crimp connectors. If the damage is extensive, such as multiple cuts or severe corrosion, it’s a good idea to replace the entire section of wire. When replacing wiring, make sure you use the correct gauge of wire and connectors. This ensures that the electrical signals can flow correctly and that the repair is long-lasting.
After repairing or replacing the wiring, it’s very important to make sure all the connections are secure. Ensure that all connectors are properly seated and locked. The wires should be properly routed to prevent damage. Use electrical tape or wire looms to cover the wires and protect them from abrasion, moisture, and extreme temperatures. Properly protecting the wiring will extend the life of your repairs and prevent future problems. Following these steps can help avoid future electrical issues and ensures that the diff lock system operates efficiently.
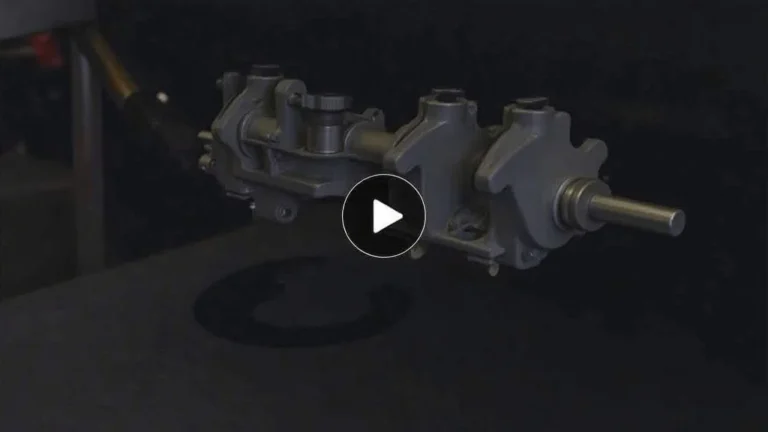
Mechanical Repairs
Mechanical issues can prevent the diff lock from disengaging. Here’s a look at some common mechanical problems and how to solve them. Proper repair can restore your truck’s off-road ability and make it dependable.
- Inspect Internal Components: If the diff lock still won’t disengage after checking the electrical system, the internal components should be inspected. This may involve removing the differential cover.
- Replace Damaged Components: Replace any worn or damaged gears, clutch packs, or other internal components that you find. This may require specialized tools and skills.
- Flush and Refill the Differential Fluid: After making the mechanical repairs, flush and refill the differential fluid. Use the correct type and amount of fluid specified by the manufacturer.
If electrical fixes do not solve the problem, the focus shifts to internal components. This often means removing the differential cover to inspect the gears, clutch packs, and other components. Check for wear, damage, or the presence of debris. Look for worn or broken components that could be preventing the diff lock from disengaging. This inspection requires some mechanical knowledge, but it’s a critical step in diagnosing mechanical issues. Proper lighting and careful handling of the internal parts will enable you to examine and identify issues accurately. Replacing or repairing damaged components is essential for getting the diff lock working again.
Replacing worn or damaged components requires specialized tools and some mechanical experience. After inspecting the internal components and identifying the specific parts that need replacement, you will need to obtain the replacement parts. The replacement process will involve removing the old components and installing the new ones. It is important to follow the manufacturer’s instructions. This may include setting the correct clearances and torque specifications. This is a complex procedure. If you are not comfortable doing it, consider bringing it to a qualified mechanic who specializes in differential work. This will ensure that the repairs are done correctly.
After mechanical repairs, flushing and refilling the differential fluid is a crucial step. During the repair, debris and contaminants can get into the differential. To remove these contaminants, flush the differential with a cleaning fluid designed for this purpose, then drain it. Fill the differential with the correct type and amount of fluid as specified by the manufacturer. Using the right fluid will ensure proper lubrication and optimal performance of the differential. This step can prevent further mechanical wear and ensure that the repaired differential operates properly.
Frequently Asked Questions
Question: Why won’t my F150 diff lock disengage at all?
Answer: Several issues can prevent disengagement, including faulty sensors, damaged wiring, or mechanical problems within the differential itself. It may also be related to vehicle speed, steering angle, or the type of terrain you’re driving on.
Question: What’s the first thing to check when my F150 diff lock is stuck?
Answer: Start with a visual inspection of the area around the differential for any obstructions like rocks or debris. After that, check the vehicle speed and steering alignment. Then, check fuses and wiring for potential issues.
Question: Can I drive with the diff lock engaged on the road?
Answer: No, you should not drive on paved roads with the diff lock engaged, as it can cause damage to the differential and tires due to the wheels turning at the same speed.
Question: What tools do I need to diagnose my diff lock problems?
Answer: You will need a basic set of tools, including a multimeter, a diagnostic scanner, and potentially some specialized tools depending on the problem (like a torque wrench, if you’re working on mechanical components).
Question: Should I take my F150 to a mechanic if I can’t fix the diff lock myself?
Answer: If you’re not comfortable with mechanical or electrical work, or if you’re unsure about the diagnostic steps, it’s best to take your truck to a qualified mechanic who specializes in differentials and 4×4 systems.
Final Thoughts
Troubleshooting why why f150 diff lock won’t disengage can seem difficult, but by following a step-by-step approach, you can fix the problem. Begin with quick checks, like inspecting the area around the differential and verifying driving conditions. Then, look into electrical issues such as sensor problems and wiring damage. If those checks don’t work, consider mechanical issues, looking at internal components and flushing fluids. The good news is, armed with the information, you can pinpoint the source of the problem and possibly fix it yourself, saving on repair costs. Get out there and get your truck running right again. Don’t let a stuck diff lock keep you off the trail. With a bit of troubleshooting, your F150 will be ready for adventure.